


It's been a while since I've shared
a little craft goodness up in here.
I made one of these little guys a while back:

I have worn it a ton
to spice up my hair on a boring day.
Here are the necessary supplies:
*A small piece of fabric
(8 inch x 6 inch-ish)
*An even smaller piece of fabric
(to cover button...
little larger than a quarter).
*An alligator clip
(available at Sally's beauty supply
for super cheap!!!! I got the smaller option.)
*A small piece of crafting cloth ribbon.
(less than 6 inches long. 3/8 inch wide)
*A kit to make a fabric button.
*Hot glue gun & glue.
Total cost= About $10-15 buckaroos
for the supplies which will end up
making many more.
Probably less than $2 per flower.
This is an estimate.
If you wanna get on the fabric flower train
and make one of these babies,
it goes a little something like this:
1.) Buy super cute fabric.
You will not need very much at all...
1/8 of a yard will make you lots.
I got lucky and found some
current Amy Butler fabric for 40% off
at the Sewing Studio's 4th of July blow out.
Definitely worth stopping in during that sale.

2.)Trace a circle-y shaped object
that is about the size of the flower
that you are wanting to sport on your head.

3.) Trace the circle on the back
of your super cute fabric.

4.) Repeat 5 more times for a total of 6 circles.

5.) Be proud of your 6 circles.

6.) Fold a circle in half.

7.) Then again in a fourth.

8.) Put the fabric fourth on a solid surface
and thread a needle through from the bottom.
This is where the project has the potential
to drive you crazy. Stick with it!
It's worth it!

9.) Paying attention to where the "fold"
is in the fabric fourth,
add another on top and take the needle through
from bottom to top again.
The "fold" should always line up facing
the same way as the previous "fold."

10.) Repeat this 6 total times.
It should complete a semi-circle
when you put on the third one (as shown below).

11.) One shy of all 6.

12.) When the sixth one is placed,
you should have your full circle.
Tack in through a few times back
and forth to make sure that all 6 pieces
stay secure on the flower.

13.) Grab the little fabric button kit
and open it up.

14.) Using the kit instructions for size
(according to the size of button
that you purchased),
cut out a coordinating (or not) piece of fabric
to be placed on the button front.
It's kind of the star of this little show...

15.) Shove button top in on top of the fabric.

16.) Then place button back
into the little whatchamajigger.
Make sure that you tuck in the fabric
so that it's covered
by the button back as shown below.

17.) Use the little plastic tool
provided in the kit
to mash down the button back in to the hole.

18.) And voila. The star is born.

19.) Next it's time to measure your ribbon.
Do so by placing as shown below.

20.) Wrap it all the way around to cover the clip.
Also, put a little mark in the middle of the ribbon.
We'll use that later to sew on the flower.

21.) Cut it right where you see
my middle finger there.
I am not shooting you a
sneaky bird or anything.
I promise.
Cutting it so that the metal
on the bottom stays
exposed will help it be
more functional when wearing
it in your (or whoever's)
beautiful flowing locks. :)

22.) Sew the flower on to the ribbon
where you marked it in step #20.

23.) Turn it around.
Place your fabric button in the center
and sew it on so that it is secure.
Marvel at the cuteness
and get ready to hot glue it on to the clip.

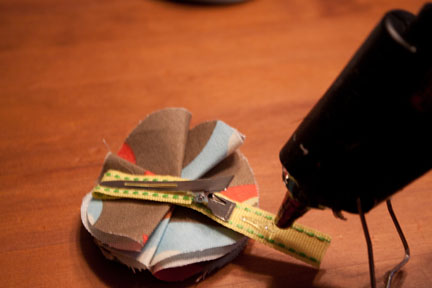
24.) Put some hot glue on the shortest end
of the ribbon and glue it
to inside of the clip as shown below.

24.) Hot glue the ribbon in small stages
until you've used up all of the ribbon.
(Again, it should end early, just before
the little cut out part
of the clip on the very bottom.)

25.) The ribbon does go in to the squeezy part
of the clip...
just like this.

26.) Find a cute little model (or a mirror)
and snap a pic of your new creation.

27.) Make sure not to overwhelm the world
with your excited face.
It's hard to contain this much joy
about being photographed
with your new fabric bloom.

Wishing you a flowery weekend~
Melonie


adorable!
ReplyDeleteI can't believe you got this on here so quick and so freaking hilarious. The end with Selah was too much. Also-- kept thinking you would suddenly bust out with what we all know the "fold" REALLY is. It was so much fun that night. Lv ya!
ReplyDeleteI would totally not say labia on my blog Em. Oh wait, did I just say labia?
ReplyDelete